
A few weeks ago, my friend Katherine asked if I'd like to join a Christmas Tree block bee. I've always wanted a Christmas quilt, so I jumped in quickly. This was our first month, and Jodie sent out some wonderful fabrics...Be Merry, by My Mind's Eye for Riley Blake. She let us go free and make whatever blocks we wanted and only asked that we not use any other fabrics.
I immediately choked - the thought of such freedom froze me in my tracks - and then scoured the internet for ideas. I knew I wanted one of the blocks to be a tree, but I didn't have much luck in finding tutorials, so it was graph paper and pencil to the rescue. Below is what I came up with after some fussing and a practice row or two to be sure the measurements would turn out.
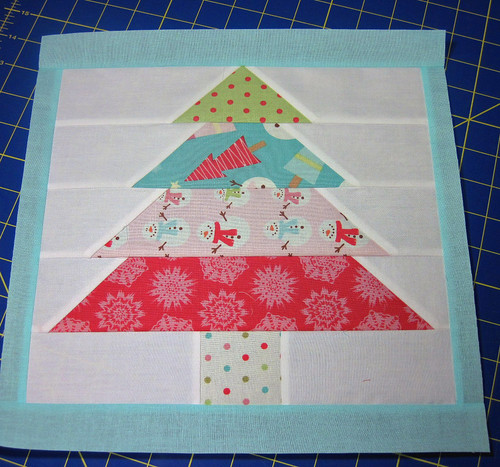
Now, a small disclaimer - I cut a bit extra beyond the measurements to be sure my block would be big enough. The measurements work, but you'll need to be careful if you're going to be exact. I'm all for making things a bit bigger and trimming down. Feel free to do the same.
What you'll need:
A selection of 2.5" wide fabrics (a jelly roll will work)
A 14x8 or so piece each of background and trim (the white and blue in my block)
Play around with your printed tree strips to get them in the order that you like.

Starting with the strip at the bottom of the tree, cut:
1 - 2-1/2 inch square (dots)
1 - 10-1/2 by 2-1/2 inch strip (snowflakes)
1 - 8-1/2 by 2-1/2 inch strip (blue bkgd snowmen)
1 - 6-1/2 by 2-1/2 inch strip (pink bkgd snowmen)
1 - 4-1/2 by 2-1/2 inch strip (green/pink dots)
The blue trees strip at the top of the picture is a piece I thought I was going to add, but didn't... just ignore that one...sorry. **grin**
From the white, cut:
2 - 6-1/2 by 2-1/2 inch strips
4 - 5-1/2 by 2-1/2 inch strips
2 - 4-1/2 by 2-1/2 inch strips
2 - 3-1/2 by 2-1/2 inch strips
We'll cut the blue trim in a bit. :)
In keeping with the bottom-up approach, start by sewing two of your 5-1/2 by 2-1/2 inch white strips to opposite sides of your 2-1/2 inch square, using a 1/4-inch seam; press. This is your tree trunk row.
Next up is the base of the tree. Take your 10-1/2 inch by 2-1/2 inch strip and set it on your cutting mat. On either side, place a white 4-1/2 by 2-1/2 strip on the corner, perpendicular to the 10-1/2 inch strip, like so:
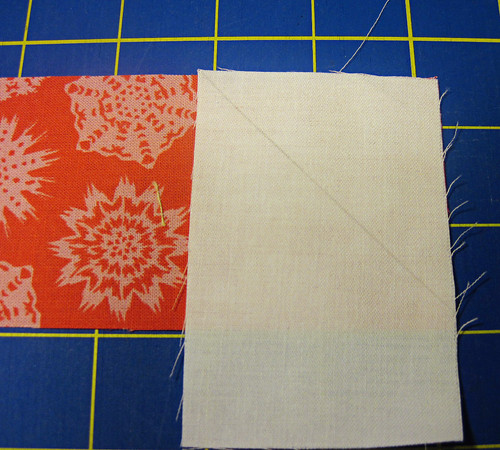
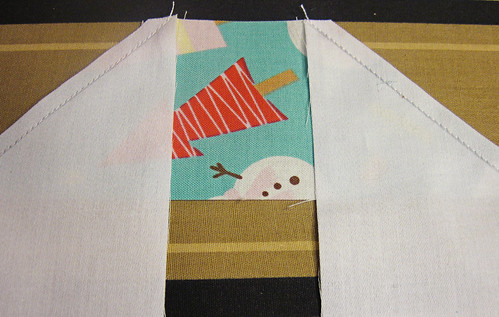
As you can see in the picture, draw (in pencil or disappearing ink) a 45-degree line from corner to corner, using your ruler. (This should seem a little familiar to you if you've ever sewn strips together for quilt binding - same process.) Repeat on the other side, but with an opposite slant.
Sew just a teensy-weensy bit to the right of the line.
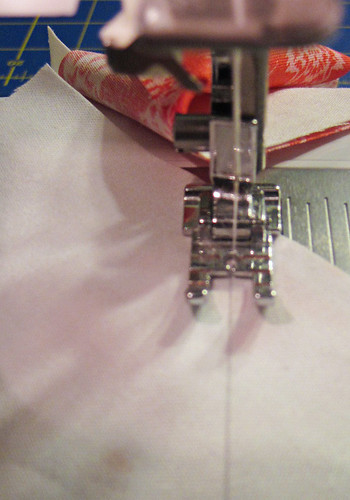
Then, sew on the other side.
Now, take your ruler and measure about a 1/4-inch from the seam you just put in and cut the excess off for a perfect 1/4-inch seam.
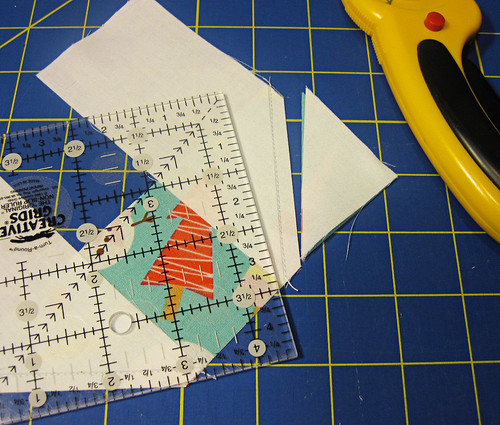
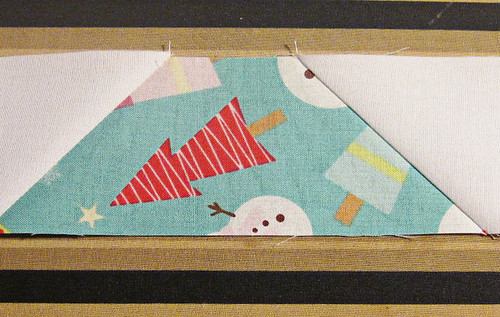
Your strip should look like this:
Press it back (I pressed towards the white, but you don't have to) and it will look like this:
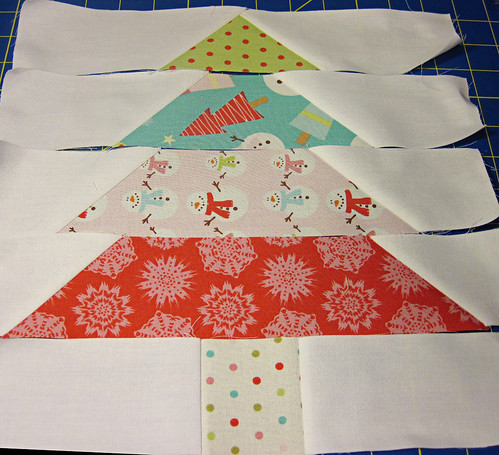
Use the exact same process to make the next three rows as you continue with each strip going up the tree. Your color/whites will match up like this:
1 - 2-1/2 inch square (dots) + 2 - 5-1/2 by 2-1/2 inch strips (trunk)
1 - 10-1/2 by 2-1/2 inch strip (snowflakes) + 2 white 3-1/2 by 2-1/2 inch strips
1 - 8-1/2 by 2-1/2 inch strip (blue bkgd snowmen) + 2 white 4-1/2 by 2-1/2 inch strips
1 - 6-1/2 by 2-1/2 inch strip (pink bkgd snowmen) + 2 white 5-1/2 by 2-1/2 inch strips
1 - 4-1/2 by 2-1/2 inch strip (green/pink dots) + 2 white 6-1/2 by 2-1/2 inch strips
When your rows are done, they will look like this:
Starting at the top, take your first row (green/pink dots) and turn it down on your second row (blue trees), centering the print strips. Pin the strips right sides together and sew; press towards the top row.
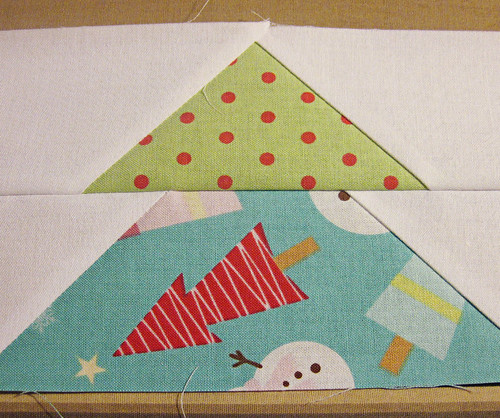
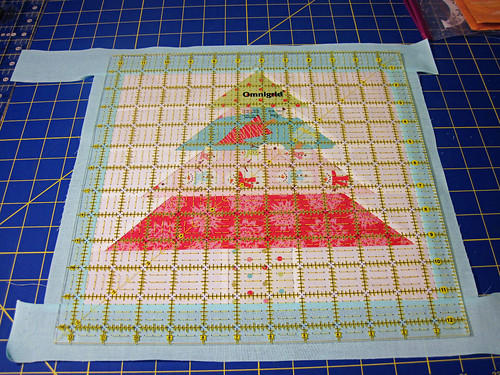
Continue down the tree, centering each row with the one before until all are sewn. Once all together (including the trunk!), trim your block so that you have even edges.
Now, at this point, if you were extra generous and your block is a perfect 12-1/2 after trimming, then you can stop. If it isn't, you can add trim. You can event trim it smaller intentionally (like I did) to add the trim. I trimmed my block to 11-1/2 inches, square.
From your trim fabric, cut two 2-inch strips that are at least 11-1/2 inches long. Sew to opposite sides of the block, using 1/4-inch seams, and press to the outside. Take the remaining trim fabric and cut two more 2-inch strips that are at least 12-1/2 inches long. Sew to opposite sides of the block and press towards the outside.
Trim your finished block to 12-1/2 inches on each side and give the seams one more press for good measure.
Ta-da!! You're done... your very own Christmas Tree block!
Enjoy!!
If you use any of my tutorials to make something, please add it to the Stitching by Starlight Flickr group - I'd love to see your work!

Thanks for sharing. I need this instruction. I received Birthday blocks from my Bee, of House Blocks. I need some trees to go in the quilt.
ReplyDeleteCarolyn
How did I miss this post?!?!? Love it. Thanks so much for the shout out and for the tutorial! I'm putting the darling little tree on my list. :)Great detail on the instructions! Katherine
ReplyDeletethank you, very nice -added to my never ending "I'll make that !" list.
ReplyDeleteLovely cute little tree - thanks for the tutorial - I'm thinking xmas mug rugs!
ReplyDeletedefinitely doing this block. thanks so much
ReplyDeleteI Love this!! So Beautiful!! Thanks for sharing!!
ReplyDeleteI Love this!! So Beautiful~~Thank you for sharing!!
ReplyDeleteI saw this done with a half hex ruler and liked it...this saves me the cost of the ruler! Thank you
ReplyDelete