Showing posts with label 12 Days of Christmas. Show all posts

9.02.2011

Finished it Friday - #6


Oh my word.

I can't remember the last time I've been this thankful to see a Friday.  Maybe today instead of "Finished it Friday", I should call this post, "I Survived to Friday".   Have you ever had one of those weeks?  You know...like this:
  • Monday:  Kids start school, new work hours (7 am - 6 pm) start.  Sewing class immediately after work, not stopping at home first.  Home about 9.
  • Tuesday:  Day two of 5:50 AM wake-up call.  Half-day grad school orientation.  Work until 6 and meet family at ball practice (where hubby graciously brings me a sandwich).  Oh yeah, and grab groceries en route.  Home about 9.
  • Wednesday: Birthday breakfast at IHOP (yes, IHOP - his choice) for the youngest.  Work all day after not sleeping most of the night.  Straight from work to church where, thankfully, they have dinner before activities.  Home - you guessed it - about 9.
  • Thursday:  Up again at 5:50 - it's not even light yet!  Class all day with a few breaks to run to the office and catch up on work.  Straight to 5:30 birthday dinner at a local restaurant and a ball game.  Massive storm hits before game, we get soaked on the way in only to have them call the game 30 minutes later.  Guess what time I got home?  
At about 4:00 yesterday afternoon, I decided come heck-or-high-water (and the high water nearly happened!) I was going to get some sewing done.  Maybe the storm was God's little gift to me as my parents, who were with us for dinner and the game, took both boys home with them to spend the night and we got to go home early.  That meant a child-free (read: guilt-free) evening with hubby and my sewing machine.

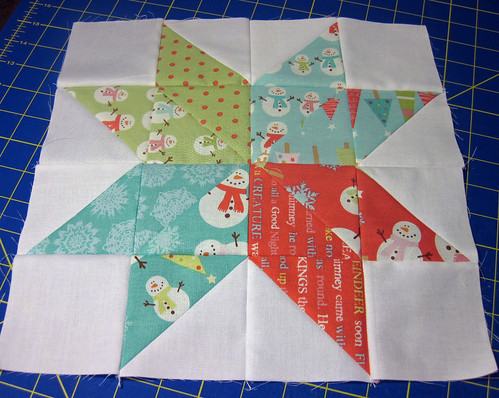
So about an hour later - and I know that because my auto-off iron shut down right before I pressed the last seams - I had these:
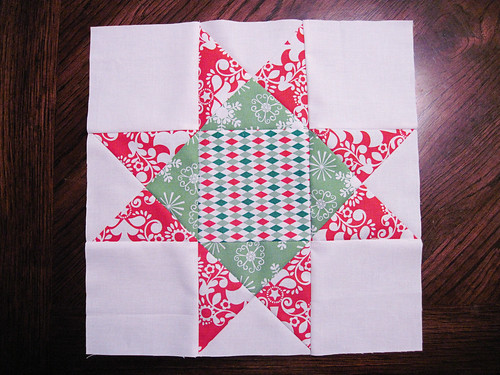
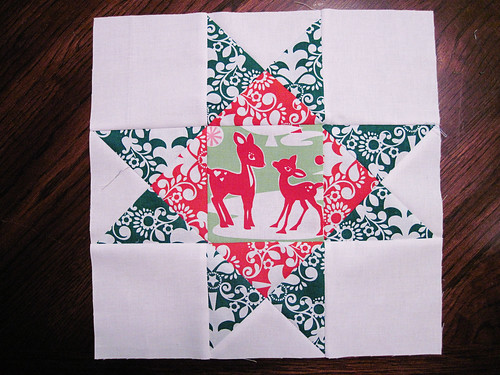


ohio star christmas 1


ohio star christmas 2


The Ohio Star was a welcome break from the sometimes complicated other blocks I've been working on.  It's simple and clean, yet looks fabulous with these fabrics.  These are both for my friend Charlene, who is in my 12 Blocks of Christmas bee.  They are a day or two late (due in August), but I'm pretty sure she'll understand.

So tell me - how has your week been??  Are you enjoying the interviews?  Has life been so crazy that you haven't read any?  Don't worry - I've not caught up with all the blogs I follow, either.

Both giveaways are still open at the time of this post.  You can always check the 10-for-10 page for updates and a list of the giveaways that are open.  At least one should be open every day in September, and most days two will be open.  :)

Now - enough rambling.  Show me what you finished this week!!  Remember - a finish is a finish.  Quilt blocks, quilt tops, entire quilts.  Handbags, back packs, lunch sacks.  Skirts, pants, shirts, scarves.  Pin cushions, mug rugs, doll quilts.  What did you check off your to-do list??

Can't wait to see your work!

Photobucket

7.13.2011

WIP Wednesday

Last night was my first chance to sew since leaving for the beach back in June. It's amazing how time at the machine and some good country music can lift your spirits. I'd been in a funk, but I swear I could feel the stress rolling off my shoulders with each stitch!

It turned out to be quite the productive night as I was able to finish blocks for four of my swap friends. I'm in two right now, TwittterB and a Christmas block swap - but ironically enough the TwitterB block for this month was a Christmas one...LOL! I almost felt like playing Christmas music. :)

The first blocks I finished were for Rene, who's been waiting forever for these. She sent us panels and fabric from Kate Spain's 12 Days of Christmas and pretty much gave us free reign, which I've decided is very dangerous for me. I'm a perfectionist at heart and that tends to trip me up and delay things.


12 Days,


Did you see the geese?  Get it?  Six geese a-laying!!!  Bwahahahahahaaa.... oh, I kill me... :)

Next up are block for Tiffany - the only non-Christmas ones of the night.  She sent us some adorable fabric with a forest village on it and asked for not-too-busy nine patches.  I used some solids and a moda marble to keep it crisp and to keep the focus on her fabric.


nine-patches


After dinner, I moved on to blocks for Rachel. She sent us some of the ultra-famous Sherbert Pips, which I had never seen in person. She had gone as far as actually cutting the fabric out for us ahead of time (very impressed!) so these were a breeze to sew together.


pips


Next in line are the blocks I finished for Moira in the 12 Days group.  I'm actually pretty proud of myself on these because the fabric came while I was away.  That means for once, I'm not only on-time but a bit early!!  Woo!! Moira used the same block that Laura had picked out a couple months ago, and I can't blame her - they are fun and oh, so easy! She sent the off-white Christmas fabric and the rest is fabric from my scrap bin. Gotta love the scrap-busting blocks.


christmas


And now - on a true Work-in-Progress note, I've made a little progress on my Bethlehem Star quilt. I have the strips cut, but no sewing yet.


star strips


This is going to be a monster of a quilt, and I'm so far behind I'm almost ashamed. A group of us are working on it together and I'm about three weeks behind due to a delay in purchasing fabric and then vacation. It will be my main focus for the next little bit because I want to catch up with the others. I'm down to only one set of blocks for a swap - I got fabric from my friend Katherine while I was away, too.

Oh, and in case you missed the posts, I finished my husband's Coffee Quilt and Molly's Quilt while away. Finally, some changes to my ongoing WIP list!!

And - on a parting note - I'm missing the beach terribly.  Re-entry is difficult, and I think it gets more difficult every year.  Here's a parting shot of my family, taken on our last night there.  Until next year, my dear Hatteras....


my family


Enjoy your week!


WIP Wednesday at Freshly Pieced


Photobucket

5.06.2011

Christmas Tree Block tutorial

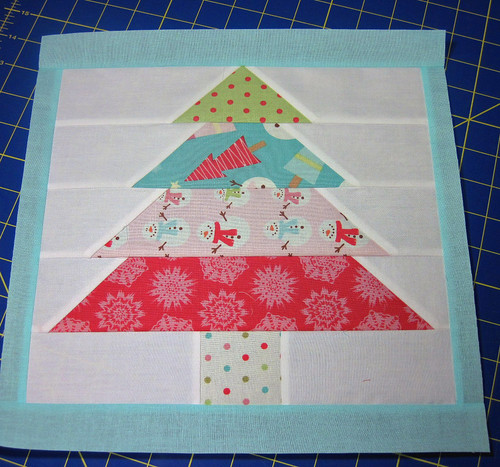
A few weeks ago, my friend Katherine asked if I'd like to join a Christmas Tree block bee. I've always wanted a Christmas quilt, so I jumped in quickly. This was our first month, and Jodie sent out some wonderful fabrics...Be Merry, by My Mind's Eye for Riley Blake.  She let us go free and make whatever blocks we wanted and only asked that we not use any other fabrics.

I immediately choked - the thought of such freedom froze me in my tracks - and then scoured the internet for ideas.  I knew I wanted one of the blocks to be a tree, but I didn't have much luck in finding tutorials, so it was graph paper and pencil to the rescue.    Below is what I came up with after some fussing and a practice row or two to be sure the measurements would turn out.

IMG_2347.JPG

Now, a small disclaimer - I cut a bit extra beyond the measurements to be sure my block would be big enough.  The measurements work, but you'll need to be careful if you're going to be exact.  I'm all for making things a bit bigger and trimming down.   Feel free to do the same.

What you'll need:
A selection of 2.5" wide fabrics (a jelly roll will work)
A 14x8 or so piece each of background and trim (the white and blue in my block)

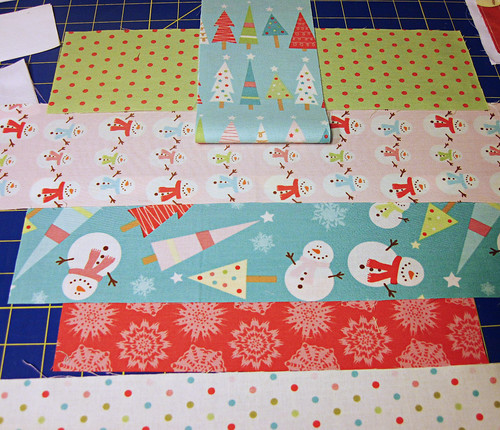
Play around with your printed tree strips to get them in the order that you like.

IMG_2333_edited-1.JPG

Starting with the strip at the bottom of the tree, cut:
1  -  2-1/2 inch square (dots)
1  -  10-1/2 by 2-1/2 inch strip (snowflakes)
1  -  8-1/2 by 2-1/2 inch strip (blue bkgd snowmen)
1  -  6-1/2 by 2-1/2 inch strip (pink bkgd snowmen)
1  -  4-1/2 by 2-1/2 inch strip (green/pink dots)

The blue trees strip at the top of the picture is a piece I thought I was going to add, but didn't... just ignore that one...sorry.  **grin**

From the white, cut:
 2  -  6-1/2 by 2-1/2 inch strips
 4  -  5-1/2 by 2-1/2 inch strips
 2  -  4-1/2 by 2-1/2 inch strips
 2  -  3-1/2 by 2-1/2 inch strips

We'll cut the blue trim in a bit.  :)

In keeping with the bottom-up approach, start by sewing two of your 5-1/2 by 2-1/2 inch white strips to opposite sides of your 2-1/2 inch square, using a 1/4-inch seam; press. This is your tree trunk row. 

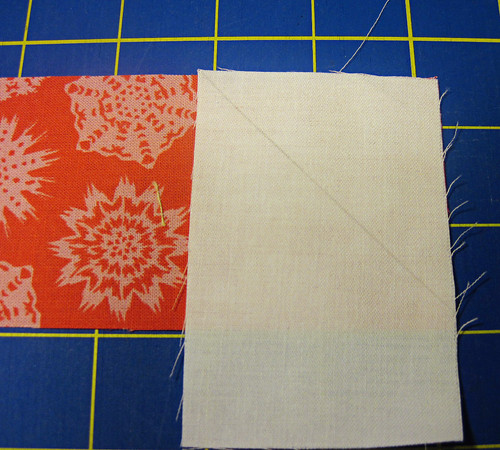
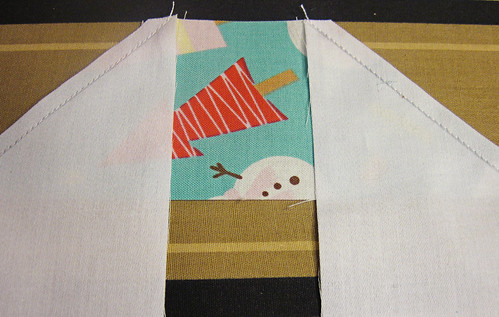
Next up is the base of the tree.   Take your 10-1/2 inch by 2-1/2 inch strip and set it on your cutting mat.  On either side, place a white 4-1/2 by 2-1/2 strip on the corner, perpendicular to the 10-1/2 inch strip, like so:

IMG_2338_edited-1.JPG

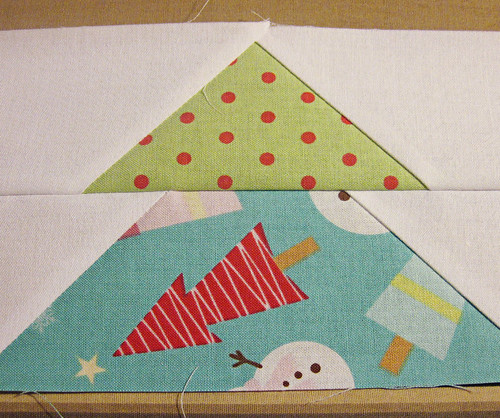
As you can see in the picture, draw (in pencil or disappearing ink) a 45-degree line from corner to corner, using your ruler.  (This should seem a little familiar to you if you've ever sewn strips together for quilt binding - same process.)  Repeat on the other side, but with an opposite slant.

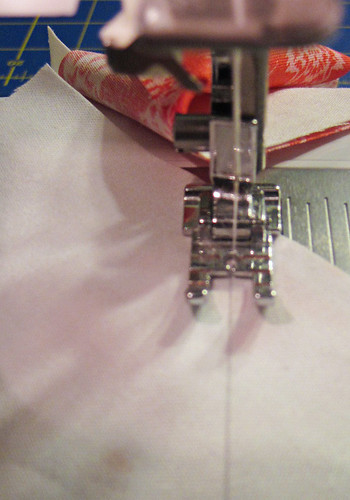
Sew just a teensy-weensy bit to the right of the line. 

IMG_2339_edited-1.JPG


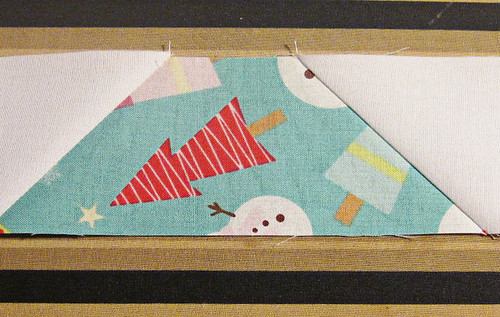
Then, sew on the other side.

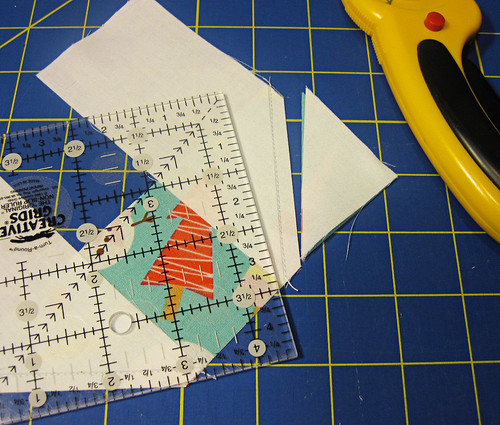
Now, take your ruler and measure about a 1/4-inch from the seam you just put in and cut the excess off for a perfect 1/4-inch seam.

IMG_2341_edited-1.JPG

Your strip should look like this:
IMG_2342_edited-1.JPG

Press it back (I pressed towards the white, but you don't have to) and it will look like this:

IMG_2343_edited-1.JPG


Use the exact same process to make the next three rows as you continue with each strip going up the tree.  Your color/whites will match up like this:

1  -  2-1/2 inch square (dots) +  2  -  5-1/2 by 2-1/2 inch strips (trunk)
1  -  10-1/2 by 2-1/2 inch strip (snowflakes) +  2 white 3-1/2 by 2-1/2 inch strips
1  -  8-1/2 by 2-1/2 inch strip (blue bkgd snowmen) +  2  white 4-1/2 by 2-1/2 inch strips
1  -  6-1/2 by 2-1/2 inch strip (pink bkgd snowmen) +  2  white 5-1/2 by 2-1/2 inch strips
1  -  4-1/2 by 2-1/2 inch strip (green/pink dots) +  2  white 6-1/2 by 2-1/2 inch strips


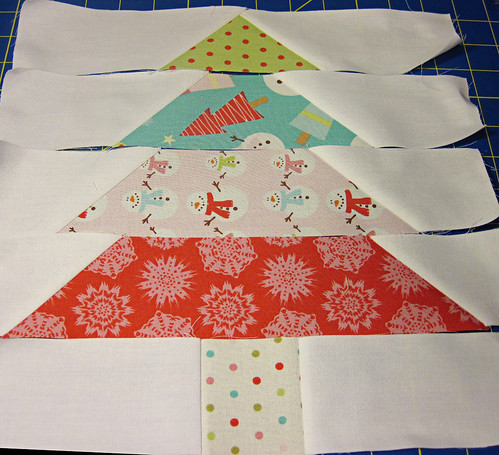
When your rows are done, they will look like this:

IMG_2344_edited-1.JPG

Starting at the top, take your first row (green/pink dots) and turn it down on your second row (blue trees), centering the print strips.  Pin the strips right sides together and sew; press towards the top row.

IMG_2345_edited-1.JPG


Continue down the tree, centering each row with the one before until all are sewn.  Once all together (including the trunk!), trim your block so that you have even edges.

Now, at this point, if you were extra generous and your block is a perfect 12-1/2 after trimming, then you can stop.  If it isn't, you can add trim.  You can event trim it smaller intentionally (like I did) to add the trim.  I trimmed my block to 11-1/2 inches, square.

From your trim fabric, cut two 2-inch strips that are at least 11-1/2 inches long.  Sew to opposite sides of the block, using 1/4-inch seams, and press to the outside.  Take the remaining trim fabric and cut two more 2-inch strips that are at least 12-1/2 inches long.  Sew to opposite sides of the block and press towards the outside. 

IMG_2346_edited-1.JPG


Trim your finished block to 12-1/2 inches on each side and give the seams one more press for good measure.

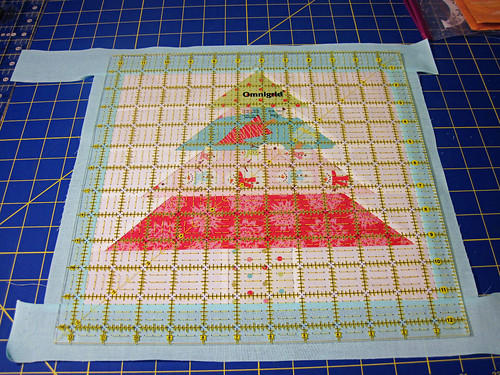
Ta-da!! You're done... your very own Christmas Tree block!


IMG_2347.JPG

Enjoy!!


If you use any of my tutorials to make something, please add it to the Stitching by Starlight Flickr group - I'd love to see your work!

Photobucket

5.04.2011

a quick update

The end of April/first of May has been a little crazy, but I've managed to get quite a bit done. I'm working hard on two tutorials to post soon, and I hope to have at least one up by the end of the week, so stay tuned!

I had several Bee blocks due at the end of the month, two for TwitterB and two for the 12 Days of Christmas Bee. (The second for TwitterB was actually optional, but I chose to do it.)

Here are the TwitterB blocks, made for Jessica:

IMG_2350.JPG

They are ticker-tape blocks, and this is my first try at it. As you probably guessed, this is the first tutorial I'm working on. It was a lot of fun, even though it was quite different than any block I have ever worked on.

The next set are for Jodie as part of the 12 Days of Christmas bee:

IMG_2349.JPG

IMG_2347.JPG

I made the star by using the Starflower Block tutorial over at Ellison Lane Quilts.  I played with it a bit in that I only made one block and her directions are for two.  Normally, I would have done two blocks for efficiency, but Jodie specifically requested two different blocks and she also asked us to not use additional fabrics.  In hindsight, I had enough of the colored prints leftover to make a second block for myself, but I didn't want to chance it going in.

The tree block is my own, and it is the second tutorial that I mentioned.  It was fun to figure out a block from scratch...I'm slowly developing a fondness for graph paper and pencils...LOL!

My apologies (again!) for the horrid lighting in these pictures.  I hope to have that resolved soon as a electrician friend of mine has agreed to install some lighting for me.  Woohoo!

In other news, I have four more blocks done on Jane's Black and White Quilt and the yard is looking better. Hubby planted all of our new plants yesterday and we'll have pine needles down by the end of the week. He tried to do that yesterday, too, but the man we buy them from wasn't home. Even with the black fabric, though, it still looks better. Will be sure to post a final pic.

Have a great hump-day!


Photobucket